Creating a Cloudflare Tunnel for Local Web Development
7 min read
If you’ve ever needed to share your locally-hosted application with clients, collaborate with remote team members, or test your website on multiple devices, you know how challenging it can be. Today, I’m going to show you how Cloudflare Tunnel has completely transformed my development workflow by making it incredibly easy to expose local applications to the internet securely.
What is Cloudflare Tunnel?
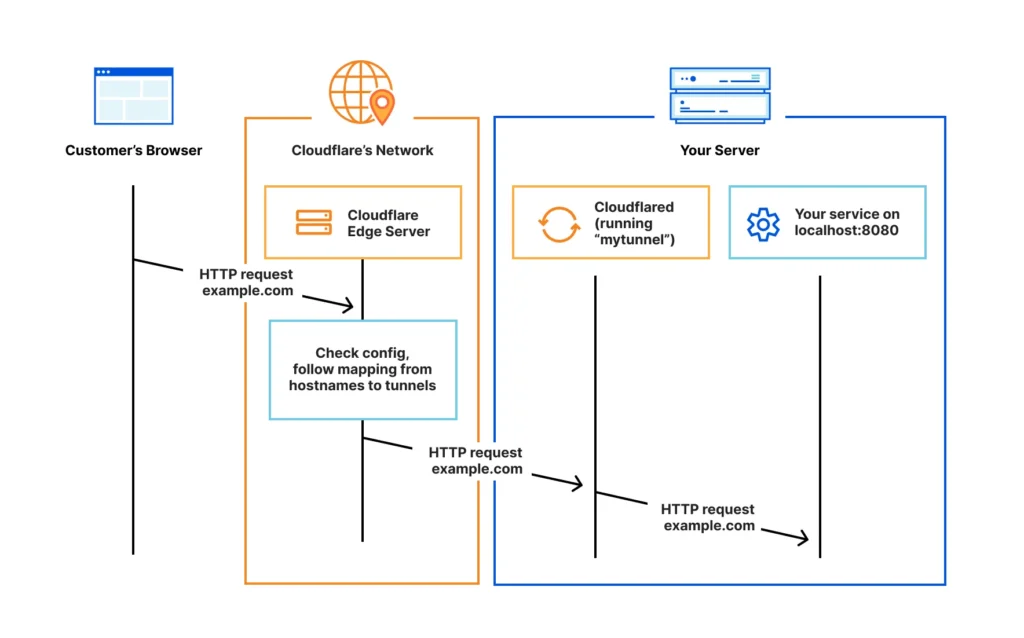
If you’re not familiar with Cloudflare Tunnel (formerly Argo Tunnel), it’s a service that creates a secure connection between your local web server and Cloudflare’s global network. Essentially, it allows you to expose your locally hosted applications to the internet without opening ports in your firewall or configuring complex networking rules.
Most people might simply deploy their applications to a testing server or use basic tools like ngrok for temporary access. While there’s nothing wrong with those approaches, I always like to dive deeper into better solutions that provide more security and functionality. That’s why I explored Cloudflare Tunnel as an alternative.
Why I Needed a Better Solution
I was working on a web application built with Laravel, and I needed a way to showcase features to clients before pushing changes to production. Initially, I used ngrok, which worked well for simple demonstrations. However, as the project grew, I needed a more robust solution with custom domain support, better security, and more reliability.
After researching various options, I discovered Cloudflare Tunnel. With this feature, I could create a direct connection from my local development environment to Cloudflare’s edge network, making my application accessible from anywhere in the world using my own custom domain.
Setting Up Cloudflare Tunnel for Your Local Application
Let me walk you through setting up Cloudflare Tunnel step by step.
1. Prerequisites
Before diving in, make sure you have:
- A Cloudflare account with your domain added and properly configured
- Admin access to your local machine
- Your application running locally (in my case, on port 8000)
2. Installing cloudflared
First, you need to install the Cloudflare Tunnel client (cloudflared). The installation process varies depending on your operating system:
For macOS:
brew install cloudflaredFor Windows: Download the installer from the Cloudflare website and run it.
3. Authentication with Cloudflare
Once installed, you need to authenticate with your Cloudflare account:
cloudflared tunnel login
This command will open a browser window where you’ll log into your Cloudflare account and authorize the tunnel client. Select your domain from the list, and Cloudflare will generate a certificate file that gets saved on your local machine.
4. Creating a Tunnel
Next, create a tunnel for your application:
cloudflared tunnel create my-app-tunnel
After running this command, Cloudflare will generate a unique ID for your tunnel and create a credentials file in the .cloudflared directory.
5. Configuring the Tunnel
Create a configuration file at ~/.cloudflared/config.yml with the following content:
tunnel: <TUNNEL_ID>
credentials-file: /path/to/credentials/file.json
ingress:
  - hostname: app.yourdomain.com
    service: http://localhost:8000
  - service: http_status:404
Replace <TUNNEL_ID> with the ID generated in the previous step, update the path to your credentials file, and set your hostname to the subdomain you want to use for your application.
6. Configuring DNS
After setting up the tunnel configuration, create a DNS record to point your subdomain to the tunnel:
cloudflared tunnel route dns my-app-tunnel app.yourdomain.com
This command creates a CNAME record in your Cloudflare DNS settings, pointing app.yourdomain.com to your tunnel.
7. Starting the Tunnel
Finally, start the tunnel:
cloudflared tunnel run my-app-tunnel
That’s it! Your locally hosted application is now accessible at https://app.yourdomain.com. The connection is secure with HTTPS, and all traffic is routed through Cloudflare’s network, giving you all the benefits of their security features.
Handling HTTPS in Local Development
One issue you might encounter is related to mixed content. Since Cloudflare Tunnel serves your site over HTTPS, but your local development environment might be using HTTP, you’ll need to make some adjustments to ensure everything works correctly.
For Laravel applications, you can update your AppServiceProvider.php to detect when it’s being accessed through Cloudflare and force HTTPS for all generated URLs:
public function boot(Request $request): void
{
    // Check if we're behind Cloudflare
    $behindCloudflare = $request->header('CF-Visitor') !== null;

    if ($behindCloudflare) {
        // Parse the CF-Visitor header to determine the scheme
        $cfVisitor = json_decode($request->header('CF-Visitor'), true);

        if (isset($cfVisitor['scheme']) && $cfVisitor['scheme'] === 'https') {
            // Force HTTPS for all URLs generated by Laravel
            URL::forceScheme('https');
        }
    }
}
This way, your application automatically detects when it’s being accessed through Cloudflare Tunnel and adjusts the URL scheme accordingly, without affecting your local development environment when you’re accessing it directly.
Running the Tunnel as a Service
For more long-term use, you can set up cloudflared to run as a background service:
On Linux:
sudo cloudflared service install
sudo systemctl start cloudflared
On macOS:
cloudflared service install
sudo launchctl start com.cloudflare.cloudflared
On Windows:
cloudflared service install
Now, whenever you start your computer, the tunnel automatically runs, making your application accessible without any manual intervention.
Benefits of Using Cloudflare Tunnel
Using Cloudflare Tunnel for exposing local applications has several advantages:
- No Port Forwarding: You don’t need to configure your router or firewall to open ports, reducing security risks.
- Custom Domain: Use your own domain name instead of random URLs generated by other tunneling services.
- Cloudflare Protection: Your application benefits from Cloudflare’s DDoS protection, WAF, and other security features.
- HTTPS Encryption: All traffic is automatically encrypted with HTTPS.
- Easy Sharing: Share your work with clients or collaborators without deploying to a staging environment.
- Convenient Testing: Test your application on various devices and networks as if it were deployed to production.
Troubleshooting Common Issues
While setting up Cloudflare Tunnel is relatively straightforward, you might encounter a few issues:
1. Mixed Content Issues
When your site is served over HTTPS but contains HTTP resources, browsers will block those resources. Make sure all your resources (images, scripts, stylesheets) are loaded using relative paths or HTTPS URLs.
For web applications like Laravel or Next.js, you can use the approach mentioned earlier to force HTTPS for all generated URLs.
2. Connection Errors
If you’re having trouble connecting to your tunnel, check the following:
- Ensure your Cloudflare account has the domain properly set up
- Verify that the tunnel is running with
cloudflared tunnel info <TUNNEL_NAME> - Check for any errors in the cloudflared logs with
cloudflared tunnel info --debug <TUNNEL_NAME>
3. DNS Propagation
After setting up the DNS record, it might take some time for the changes to propagate. If you can’t access your application immediately, wait a few minutes and try again.
Cloudflare Tunnel vs. Other Solutions
Compared to other solutions like ngrok or localtunnel, Cloudflare Tunnel offers several advantages:
- Custom Domain: Use your own domain instead of random subdomain names.
- Security: Benefit from Cloudflare’s security features.
- Reliability: Cloudflare’s global network ensures reliable connections.
- Persistence: Set up tunnels that persist even after reboots.
- Free Tier: Basic usage is available on Cloudflare’s free plan.
Wrapping Up
Cloudflare Tunnel has become an essential tool in my development workflow. It allows me to showcase my applications to clients, test on multiple devices, and collaborate with team members without the hassle of traditional deployment.
If you’re looking for a secure and convenient way to expose your local applications to the internet, I highly recommend giving Cloudflare Tunnel a try. It’s free for basic use, easy to set up, and provides a level of security and convenience that’s hard to match with other solutions.
Have you tried Cloudflare Tunnel or similar services for your projects? What challenges did you face when trying to expose your local applications to the internet? Let me know in the comments!